HOW TO PRESENT YOUR IMAGES FOR COMPETITIONS
Ordnance Survey Photographic Society
PREPARING PRINT & PDI ENTRIES FOR COMPETITION
PRINTS
These can be window or flush mounted but to be eligible for SPF & PAGB competitions they need to be mounted on a 400 mm x 500mm board. ( The OSPS Secretary orders board pre-cut to this size from time to time). Prints must be labelled with Club Name, Author's Name and Print Title. SPF competitions now require print titles to be read out so naming of prints is significant as it can affect the points awarded to the print.
PDI (Projected Digital images)
RESIZING IMAGES FOR DIGITAL PROJECTION
Background: In order to understand what happens in these instructions you need to think of your picture as if you were going to mount it on a canvas. You can change the size of the picture and/or the size of the canvas but remember that the projector has a landscape format “canvas” so that if your picture is in portrait format there will be gaps on either side of it. (These can be filled in black see 4/. below)
PICTURE SIZES
The size of the picture and the size of the canvas are measured in pixels (dots)
The SPF & PAGB competitions are projected on a canvas 1400 pixel wide and 1050 pixels high.
In order that all our competition entries are available for SPF & PAGB competitions, we require your entries to meet this format. (1400 wide x 1050 high)
N.B. Please note that the words ‘wide’ & ‘high’ are critical, a picture that is 1400 pixels high will fall off the top & bottom of the screen!
How do you know what your picture size is now, before you start?
- Photoshop Elements: Image/Resize/Image Size
RE-SIZING
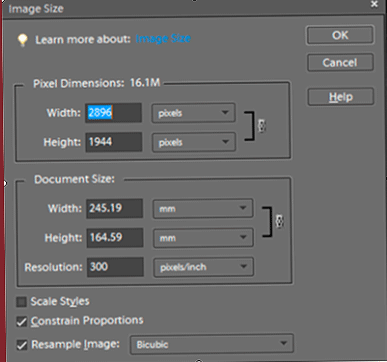
Open your image in Photoshop and select ~ Image/Resize/Image Size
It is important that the ‘Constrain Proportions” box is ticked to preserve the shape (aspect ratio) of your image.
If you are preparing a PDI for competition you will need to change the Pixel Dimensions width to 1400 or less OR the Pixel height to 1050 or less. ( For best quality one of these dimensions should be at its largest value).
If you are preparing a picture for printing the Document Size needs to be set to within your printer paper size AND the Resolution should be at 300 or more for best quality.
CROPPING
( This is the Cropping Tool in Adobe programs)
Very often the image you have taken with the camera is bigger than you want to project. Cropping is getting rid of the bit you don’t want.
1/. You can set the cropping tool WIDTH box to 1400 px (pixels) and the HEIGHT box to 1050 px and then draw a rectangle out using the crop tool. TRY IT! This creates the size of picture you want on the same sized canvas.
2/. You would like a border? For PDI a small border of a few pixels can be created by resizing or cropping your image the appropriate number of pixels under size and then creating a border by increasing the canvas size by the same number of pixels . (see item {4/.} below). For PRINTS a similar exercise measured in mm. will produce the required result!
3/. You don’t want a full sized picture? A ‘Letterbox’ ?
Use the crop tool to cut out the rectangle you want, remember it has to be within the 1400 x 1050 rectangle that is projected.
4/. This is your picture, you now want to extend the canvas to the projector size
In Adobe Photoshop Elements: Image/Resize/Canvas Size
Check that the Relative box is unchecked
Set the extension colour to ‘Black’ (or any other colour if you really want it!)
Set the canvas size to Width 1400 pixels and Height to 1050 pixels.
This should have created the image you want with a Black background for projection.
FAILED?
FILE NAMES
In order to compete in OSPS competitions the file name must contain 3 pieces of information.
1/. The author’s name (and distinctions) Eg. My Name LRPS
2/. The Title of the picture Eg. My Best Picture (Nb. No punctuation is permitted)
3/. The Competition it is being entered for. P ( Primary), S (Senior), O (Open), (L,C,R should be used for the Panel of 3images) { denotes projection position Left, Centre, Right }
Thus a filename looks like this…
for a Primary Class Entry A Name distinctions_My Best Picture_P
for a Senior Class Entry A Name distinctions_My Best Picture_S
for an Open Class Entry A Name distinctions_My Best Picture_O
for Panel of 3 Left Entry A Name distinctions_My Best Picture_L
for Panel of 3 Centre Entry A Name distinctions_My Best Picture_C
for Panel of 3 Right Entry A Name distinctions_My Best Picture_R
Placing the “underscore” (_) sign between these elements enables the computer program to use the data correctly
Spaces are permitted within the author & title sections but NOT next to the “underscore” sign.
SUBMITTING YOUR ENTRY
You should send the titles of your prints and your images to [email protected] well before the competition date and give yourself time to review your entries and make sure they are exactly what you want to submit!. (Late entries cause stress for Competition Secretaries and they have their own lives to live besides sorting out all your entries!)
When you attach your digital files to an email they get compressed into a “zip” file and the subject line of the Email becomes the title of this “zip” file, so please make your Email subject line unique by including your name and some indication of the competition it is intended for. “Openpdi” is not good enough as it may well clash with someone else’s file name! “My Name 23Oct Open PDI” is MUCH more helpful.
ENTRIES THAT GO ON TO REPRESENT OUR SOCIETY IN EXTERNAL COMPETITIONS (PAGB & SPF)
These entries reflect on the commitment of our society to produce the best possible entry. Please make sure that all the size & format rules are satisfied and that items like the mounting and labelling of your entries are the very best you can do.
Title labels are often produced by the competition organiser, but they need the correct information from you and this must include the Society Name and any distinctions you may hold.
If you have trouble with Spellings then check them out on your computer first! (Poor spelling can now detract from your picture score!)
Martin Buckley
Hon. Sec.
Open your image in Photoshop and select ~ Image/Resize/Image Size
It is important that the ‘Constrain Proportions” box is ticked to preserve the shape (aspect ratio) of your image.
If you are preparing a PDI for competition you will need to change the Pixel Dimensions width to 1400 or less OR the Pixel height to 1050 or less. ( For best quality one of these dimensions should be at its largest value).
If you are preparing a picture for printing the Document Size needs to be set to within your printer paper size AND the Resolution should be at 300 or more for best quality.
CROPPING
( This is the Cropping Tool in Adobe programs)
Very often the image you have taken with the camera is bigger than you want to project. Cropping is getting rid of the bit you don’t want.
1/. You can set the cropping tool WIDTH box to 1400 px (pixels) and the HEIGHT box to 1050 px and then draw a rectangle out using the crop tool. TRY IT! This creates the size of picture you want on the same sized canvas.
2/. You would like a border? For PDI a small border of a few pixels can be created by resizing or cropping your image the appropriate number of pixels under size and then creating a border by increasing the canvas size by the same number of pixels . (see item {4/.} below). For PRINTS a similar exercise measured in mm. will produce the required result!
3/. You don’t want a full sized picture? A ‘Letterbox’ ?
Use the crop tool to cut out the rectangle you want, remember it has to be within the 1400 x 1050 rectangle that is projected.
4/. This is your picture, you now want to extend the canvas to the projector size
In Adobe Photoshop Elements: Image/Resize/Canvas Size
Check that the Relative box is unchecked
Set the extension colour to ‘Black’ (or any other colour if you really want it!)
Set the canvas size to Width 1400 pixels and Height to 1050 pixels.
This should have created the image you want with a Black background for projection.
FAILED?
- Did you select “Canvas Size” OR “Image Size”?
- Picture too big? Did you select pixels?
FILE NAMES
In order to compete in OSPS competitions the file name must contain 3 pieces of information.
1/. The author’s name (and distinctions) Eg. My Name LRPS
2/. The Title of the picture Eg. My Best Picture (Nb. No punctuation is permitted)
3/. The Competition it is being entered for. P ( Primary), S (Senior), O (Open), (L,C,R should be used for the Panel of 3images) { denotes projection position Left, Centre, Right }
Thus a filename looks like this…
for a Primary Class Entry A Name distinctions_My Best Picture_P
for a Senior Class Entry A Name distinctions_My Best Picture_S
for an Open Class Entry A Name distinctions_My Best Picture_O
for Panel of 3 Left Entry A Name distinctions_My Best Picture_L
for Panel of 3 Centre Entry A Name distinctions_My Best Picture_C
for Panel of 3 Right Entry A Name distinctions_My Best Picture_R
Placing the “underscore” (_) sign between these elements enables the computer program to use the data correctly
Spaces are permitted within the author & title sections but NOT next to the “underscore” sign.
SUBMITTING YOUR ENTRY
You should send the titles of your prints and your images to [email protected] well before the competition date and give yourself time to review your entries and make sure they are exactly what you want to submit!. (Late entries cause stress for Competition Secretaries and they have their own lives to live besides sorting out all your entries!)
When you attach your digital files to an email they get compressed into a “zip” file and the subject line of the Email becomes the title of this “zip” file, so please make your Email subject line unique by including your name and some indication of the competition it is intended for. “Openpdi” is not good enough as it may well clash with someone else’s file name! “My Name 23Oct Open PDI” is MUCH more helpful.
ENTRIES THAT GO ON TO REPRESENT OUR SOCIETY IN EXTERNAL COMPETITIONS (PAGB & SPF)
These entries reflect on the commitment of our society to produce the best possible entry. Please make sure that all the size & format rules are satisfied and that items like the mounting and labelling of your entries are the very best you can do.
Title labels are often produced by the competition organiser, but they need the correct information from you and this must include the Society Name and any distinctions you may hold.
If you have trouble with Spellings then check them out on your computer first! (Poor spelling can now detract from your picture score!)
Martin Buckley
Hon. Sec.

